The POS Option is about setting the following areas of POS transaction:
- Receipt
- Data Entry
- Weighing Scale
- Appearance
- LCD Customer Display
Go to Point of Sale > POS Option
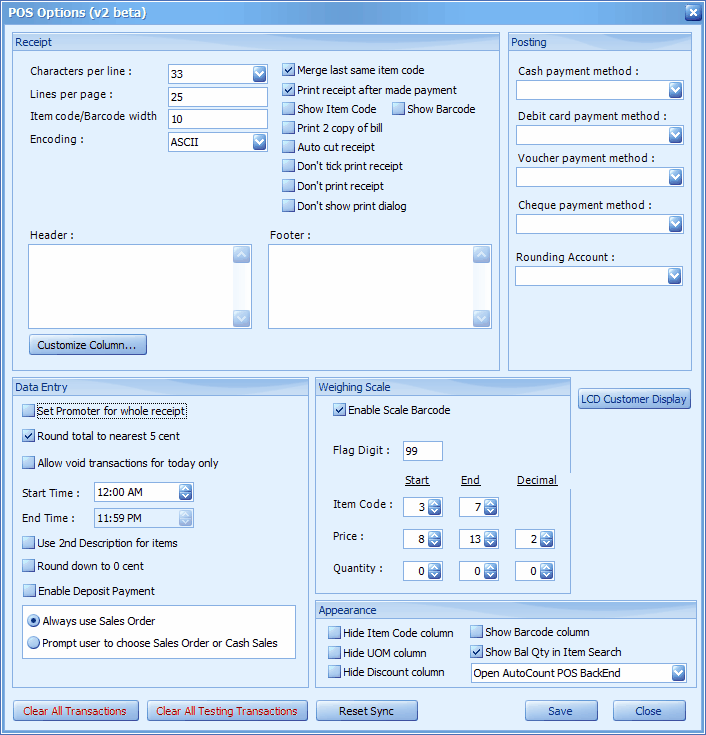
Receipt
Characters per line: this is the width of printing area, 33 or 40 is for small receipt printer, 80 is for standard impact printer (or dot-matrix printer, A4 size).
Lines per page: this is the minimum length of printing area. Recommended = 25.
Item code/barcode width: this is the maximum width of item code and barcode to be printed on receipt.
Encoding: select the encoding type.
Merge Last Same Item Code: check this box to increase the quantity when you scan the same item code again (not applicable for 'line printing'); uncheck to add a new line when scanning the same item code again.
Print Receipt after made payment: check this box so that the receipt will be printed only after payment is made (bill printing); uncheck this box means the receipt will be printed line by line upon scanning of each item (line printing).
Show Item/Bar Code: check to to print either Item Code or Bar Code on the receipt.
Print 2 Copy of Bill: check to always print 2 copies of receipt.
Auto cut receipt: check to automatically cut the receipt from paper roll upon completion of printing.
Don't tick print receipt: check this so that by default the 'print receipt' checkbox (when making payment) will not be ticked.
Don't print receipt: check this so that the system by default will not print receipt.
Don't show print dialog: uncheck this so that the system will not print the receipt directly, and instead show the print dialog screen. This option will function only when user is using ExtraReport in Configuration > Device Option (Printer).
Header/Footer: Key in the text that to be appear on the Header and Footer of each receipt. Header if left blank will print Company name and registration number.
Customize Column: click on this button to call out the following screen:
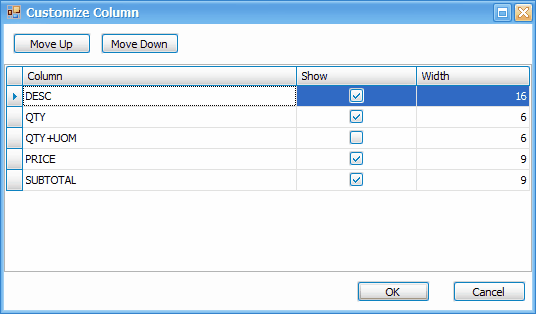
- Highlight the column name, click on Move Up or Move Down button to adjust the sequence of the printout from left to right.
- You may decide which column to show or not to show, and the width of each column.
- The total width of 'checked' columns must not exceeded the value in Characters per line.
Data Entry
Set promoter for whole receipt: check this so that 'select promoter' screen will be prompted before the beginning of each new receipt.
Round total to nearest 5 cent: check this so that the total amount will be rounded to nearest 5 cent.
Allow void transactions for today only: check this so that voiding transaction is allowed only on current day's transaction. To be more specific, you may also set the time frame when transactions can be voided.
Use 2nd description for item: check this so that the 2nd description of the item file maintenance will be captured.
Round down to 0 cent: check this so that the total amount will be round down to 0 cent.
Enable deposit payment: check this to enable the feature feature of Deposit. You may choose to default the transaction as Sales Order (for Deposit purpose), or allowing user to decide before the beginning of each new transaction, either it is a Sales Order or Cash Sale.
Weighing Scale
Enable Scale Barcode: check to enable the weighing scale barcode.
Flag Digit: this is a one-digit number to differentiate weighing scale item from others. It is usually 99.
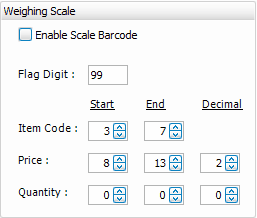
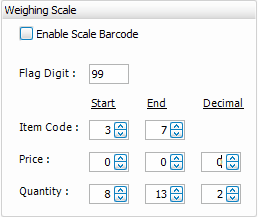
Weighing scale item barcode usually is 13 digit, which ends with Price or Quantity.
For example: Flag Digit took up the first 2 digits, Item Code (5 digits) will begin from the 3rd digit and end at 7th.
Then following by Price (6 digits) which begins from the 8th digit and ends at 13th digit.
Alternatively, ignore the price and set the Quantity (6 digits) that begins with 8th digit and ends at 13th digit.
Appearance
Hide Item Code: check this so that the item code will not be displayed during transaction.
Hide UOM column: check this so that the UOM column will not be displayed during transaction.
Hide Discount column: check this so that the discount column will not be displayed during transaction.
Show Barcode column: check this so that the bar code column is displayed during transaction.
Show balance qty in item search: check this so the the item balance quantity will be displayed during item search.
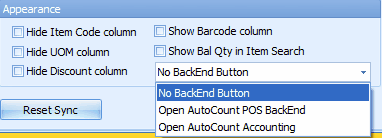
No BackEnd Button: not to show 'Open BackEnd' button in AutoCount POS.
Open AutoCount POS BackEnd: show 'Open BackEnd button in AutoCount POS, which will lead to AutoCount POS BackEnd login screen.
Open AutoCount Accounting: show 'Open BackEnd button in AutoCount POS, which will lead to AutoCount Accounting login screen.
Clear All Transactions: this button is used to clear all POS transactions that were saved in this database. Admin password is need to proceed. This is mainly used in outlets after its transactions have been synced to HQ database.
Clear All Testing Transactions: this is to clear all the 'testing' transactions so that you may start using the APOS with real transaction. Testing transactions are transactions marked with 'testing' when a terminal is defined as 'Testing' (see Terminal Maintenance)
After cleared the testing transaction, uncheck the 'Testing' checkbox in Terminal Maintenance before start with real transaction.
Reset Sync: this is to reset the sync status of transaction.

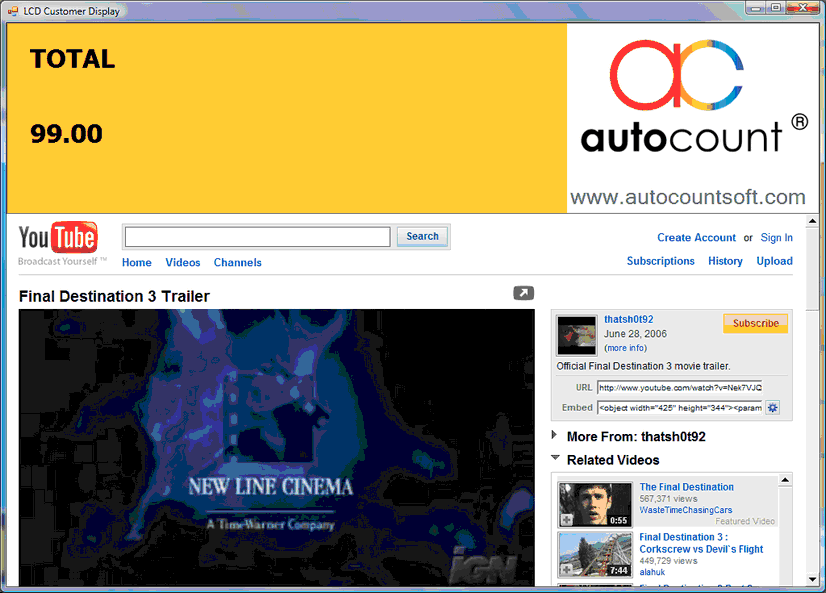
LCD Customer Display: this is to set the contents to be displayed on LCD customer display.
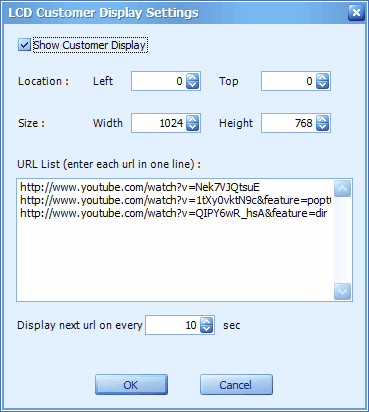
Show Customer Display: check this to activate the LCD customer display.
Location: set the location of the display screen.
Size: set the size of the screen.
URL List: key in the URL line by line.
Display next url on every ? second: this is to switch from one url to another in a specified number of seconds.
Click on OK, and every time you launch AutoCount POS, the LCD Customer Display will show the screens as your setting.