Account Book and Database
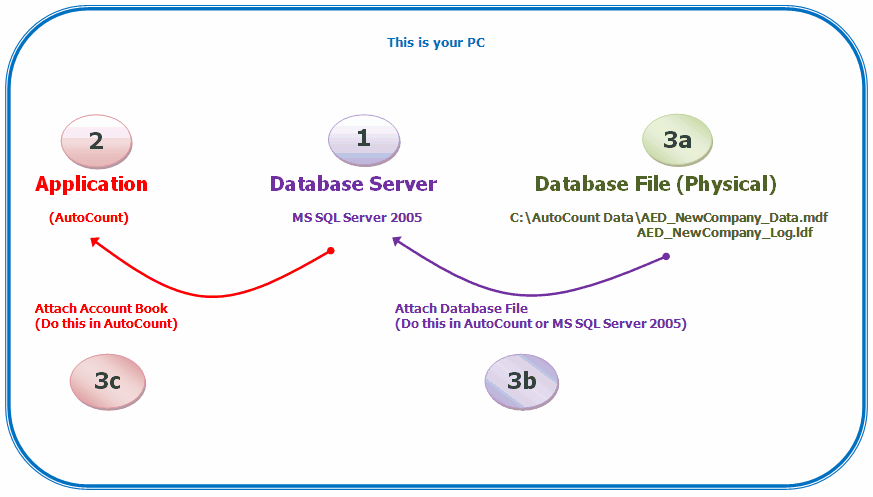
The following illustration gives you a brief idea of the relationship of application (AutoCount), SQL Database Server and database (account book):
In Case of Stand Alone
1. Install SQL Server (regardless of the edition) onto your PC, your PC becomes the Database Server.
2. Install AutoCount (application)
3. Create an Account Book (database):
(a) By default, the database is to be located at C:\AutoCount Data.
Each database (also called Account Book in AutoCount) consists of 2 files. For example, my database name for the account book is 'NewCompany', the 2 files are: AED_NewCompany_Data.mdf and AED_NewCompany_Log.ldf
(Note: If you want to change the location of the database (let's say from C:\AutoCount Data .. to another location) after it was attached to SQL Database Server, you must do so ONLY after you have detached the database from database server or stopped the service of SQL Server.)
(b) The database (NewCompany) will then be attached to the SQL Database Server. (This process is called Attach Database File).
You may attach/detach any of the databases by access to SQL Server Management Studio (for the case of Microsoft SQL Server 2005). Bear in mind that to detach is to break the link and not delete the database, the database remain at C:\AutoCount Data and it can be attached again. Attach database can also be done in AutoCount File > Manage Account Book.
(c) Link the AutoCount to a database on SQL Database Server. (This process is called Attach Account Book).
You may attach/detach the Account Book by access to AutoCount File > Manage Account Book. There you can also Delete Account Book which is to detach and also remove the database.
Each time a user login to AutoCount, the application (AutoCount) will get the link information from a Account Book Control File (it is a .dmf file). If this .dmf file is missing or contains invalid information, the login will fail.
(All the steps above are done automatically once you have completed the installation from AutoCount CDROM. Actions such as Attach/Detach account book/database is needed only changes have been made in you database server or database folder location.)

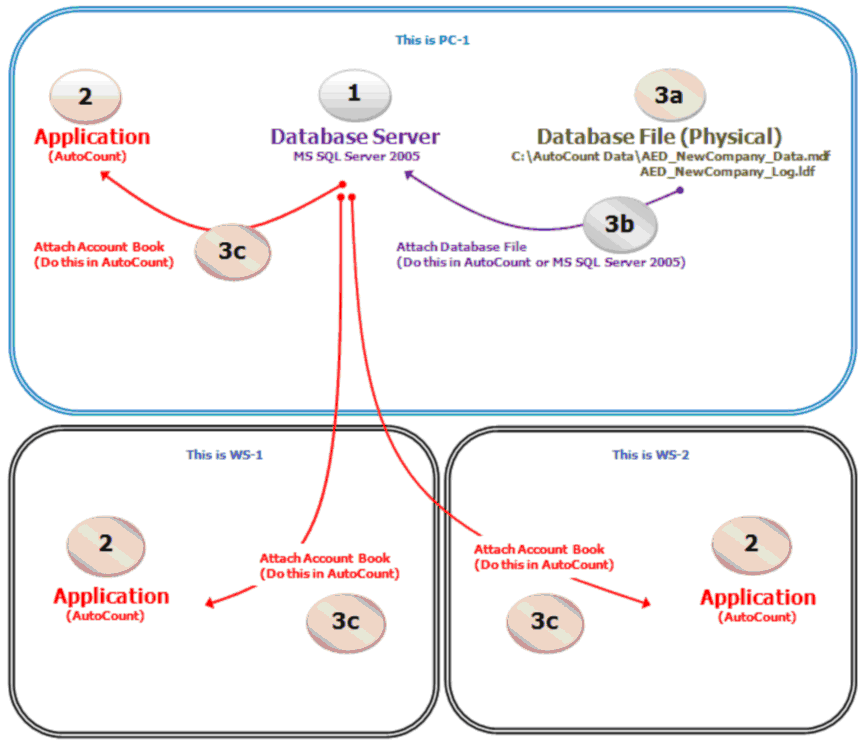
In Case of Networking
1. Install SQL Server (regardless of the edition) onto PC-1, the PC-1 is meant for and will be the Database Server.
2. Install AutoCount (application) onto PC-1, WS-1 and WS-2. WS means workstation.
3. Create an Account Book (database) in PC-1;
(a) By default, the database is to be located at C:\AutoCount Data (in PC-1)
Each database (also called Account Book in AutoCount) consists of 2 files. For example, my database name for the account book is 'NewCompany', the 2 files are: AED_NewCompany_Data.mdf and AED_NewCompany_Log.ldf
(Note: If you want to change the location of the database (let's say from C:\AutoCount Data .. to another location) after it was attached to SQL Database Server, you must do so ONLY after you have detached the database from database server or stopped the service of SQL Server.)
(b) The database (NewCompany) will then be attached to the SQL Database Server within PC-1. (This process is called Attach Database File).
You may attach/detach any of the databases by access to SQL Server Management Studio (for the case of Microsoft SQL Server 2005). Bear in mind that to detach is to break the link and not delete the database, the database remain at C:\AutoCount Data and it can be attached again. Attach database can also be done in AutoCount File > Manage Account Book.
(c) Link the AutoCount to a database on SQL Database Server. (in PC-1, WS-1 and WS-2.)(This process is called Attach Account Book).
You may attach/detach the Account Book by access to AutoCount File > Manage Account Book. There you can also Delete Account Book which is to detach and also remove the database.
Each time a user login to AutoCount, the application (AutoCount) will get the link information from a Account Book Control File (it is a .dmf file). If this .dmf file is missing or contains invalid information, the login will fail.
If there are many workstations, instead of attaching the same account books one by one in each workstation, you may:
(i) Firstly, at PC-1, attach the account books; then create a new folder and shared to all workstations; run Save To New Account Book Control File to save and move the DMF file to the shared folder.
(ii) Secondly, at WS-1, run Open Account Book Control File, point to the server (PC-1) path and look into DMF file in the shared folder;
(iii) repeat step (ii) for other WS.

_____________________________________________________________
Send feedback about this topic to AutoCount. peter@autocountSoft.com
© 2013 Auto Count Sdn Bhd - Peter Tan. All rights reserved.